
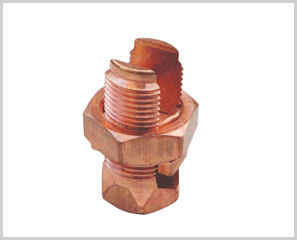
- For branching conductor
- Material: Brass
- Surface: Copper or Tin plated to protect against corrosion
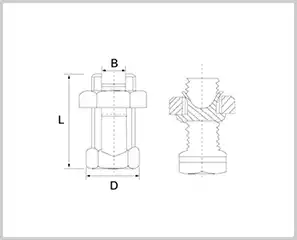
| Part No. | Item | Dimensions (mm) | ||
| L | D | B | ||
| A020801 | SB10 | 27 | 13 | 5.0 |
| A020802 | SB16 | 30 | 14 | 6.0 |
| A020803 | SB25 | 32 | 17 | 7.0 |
| A020804 | SB35 | 38 | 17 | 8.5 |
| A020805 | SB50 | 42 | 19 | 10.0 |
| A020806 | SB70 | 46 | 21 | 11.0 |
| A020807 | SB95 | 46 | 26 | 13.3 |
| A020808 | SB120 | 50 | 26 | 14.5 |
| A020809 | SB150 | 55 | 30 | 16.5 |
| A020810 | SB185 | 60 | 30 | 17.2 |
| A020811 | SB240 | 65 | 32 | 19.3 |
While Copper C-Clamps are permanent compression fittings, Brass Split Bolts (also known as “Kearneys”) are their mechanical counterparts. They are designed for versatility and ease of use, allowing for secure electrical connections without the need for specialized hydraulic crimping tools.
Here is an overview of the primary applications for brass split bolts.
Key Applications of Brass Split Bolts
1. Residential and Commercial Grounding
Split bolts are the industry standard for connecting grounding electrode conductors. They are frequently used to bond a copper ground wire to a ground rod or to connect multiple ground wires together in a service entrance panel. Their ability to be tightened with a standard wrench makes them ideal for field repairs and residential upgrades.
2. Splicing and Tapping Power Lines
In scenarios where a permanent “cold weld” (like a C-tap) isn’t required, split bolts allow for:
- Parallel Splicing: Joining two wires running side-by-side.
- Tap Connections: Connecting a branch wire to a continuous main “run” wire without cutting the main line.
3. Temporary Power Installations
Because split bolts are removable and reusable, they are the go-to choice for temporary power at construction sites, festivals, or mobile generators. They allow technicians to set up a power distribution network and then disassemble it once the project is complete.
4. Lightning Protection Systems
Split bolts are used to secure copper cables to lightning rods and down-conductors. Their high-strength brass construction ensures they can handle the mechanical vibrations and thermal expansion associated with outdoor exposure.
5. Industrial Machinery Wiring
In factories, split bolts are often found inside large motor terminal boxes. They provide a high-pressure connection for heavy-gauge motor leads that may need to be disconnected for maintenance or motor replacement in the future.
Advantages vs. C-Clamps
| Feature | Brass Split Bolt | Copper C-Clamp |
| Installation Tool | Standard Wrench / Socket | Hydraulic Crimper & Dies |
| Permanence | Removable / Adjustable | Permanent (Must be cut to remove) |
| Material | High-strength Brass Alloy | Electrolytic Copper |
| Skill Level | Low (Easy for DIY/General Electricians) | High (Requires precise tool/die matching) |
Important Usage Guidelines
Material Compatibility
Standard brass split bolts are designed for Copper-to-Copper connections.
Warning: If you are connecting Aluminum to Copper, you must use a “Dual-Rated” (AL7CU or AL9CU) split bolt, which is typically tin-plated and includes a physical internal spacer to prevent galvanic corrosion.
Torque is Critical
Unlike a crimp, which is governed by the die size, a split bolt’s reliability depends on torque. If under-tightened, the connection will have high resistance and heat up; if over-tightened, you risk “necking” or snapping the bolt threads.
Proper Insulation
Split bolts have sharp edges and a bulky profile. When used in energized (non-grounding) applications, they require a specific taping method:
Vinyl Electrical Tape (for mechanical protection).
Varnished Cambric Tape (to prevent the bolt from cutting the outer tape).
Rubber Mastic Tape (for moisture sealing and padding).
Installing a Brass Split Bolt is a straightforward mechanical process, but it requires precision to ensure the connection doesn’t loosen over time. Unlike C-Clamps, you don’t need a hydraulic press—just standard hand tools.
Guide: Installing a Brass Split Bolt
Tools Needed
- Two Wrenches: (Adjustable, socket, or open-end) One to hold the bolt head, one to turn the nut.
- Wire Brush: To clean the oxidation off the conductors.
- Wire Strippers/Knife: To remove insulation.
- Oxide Inhibitor: (Recommended) A conductive paste to seal the connection.
- Torque Wrench: (Optional but recommended) To ensure the bolt is tightened to manufacturer specs.
Step-by-Step Instructions
1. Prepare the Conductors
Strip the insulation from both the Run (main) wire and the Tap (branch) wire. Remove only as much as needed to fit through the bolt—usually about 1 to 2 inches.
- Crucial Step: Use a wire brush to scrub the bare copper until it is bright and shiny. This removes the non-conductive oxide layer.
2. Apply Inhibitor
Apply a thin layer of antioxidant joint compound to the cleaned copper. This prevents air and moisture from reaching the contact point, which stops future corrosion.
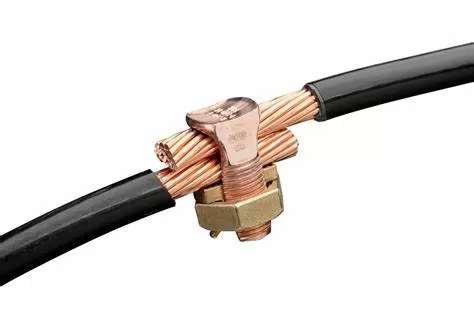
3. Assemble the Connection
- Unscrew the nut and remove the internal pressure bar (the sliding piece inside the bolt).
- Slide the Run wire into the open “slot” of the bolt.
- Slide the Tap wire in next to it.
- Re-insert the pressure bar. The bar should sit between the nut and the wires to prevent the nut from “chewing” into the copper strands as you tighten it.
4. Tighten the Nut
- Thread the nut back onto the bolt by hand to ensure it isn’t cross-threaded.
- Use one wrench to hold the head of the bolt steady.
- Use the second wrench to tighten the nut firmly.
- The Goal: You want the wires to be compressed together so tightly that they slightly deform against each other, creating maximum surface contact.
5. Torque and Check
If you have a torque wrench, follow the inch-pounds ($lb\cdot in$) rating listed on the packaging. If not, tighten until the wires are “rock solid” and cannot be moved by hand. Give the wires a firm tug to ensure they don’t slide.
Essential Safety Checklist
[IMPORTANT]
1. Insulation is Key: Because split bolts have a bulky, irregular shape with sharp corners, they are difficult to tape. If the wire is energized (not a ground wire), you must use “Split Bolt Insulator Covers” (plastic snap-on shells) or a “three-layer tape” method (cambric tape, then rubber, then vinyl).
2. Avoid Over-tightening: While you want it tight, excessive force can “neck” (stretch) the brass threads, causing the bolt to snap or fail months later due to thermal expansion.
3. Copper Only: Ensure you are using copper wires with a brass bolt. If you are using aluminum wire, you must use a tin-plated version with a spacer.
Common Torque Guidelines (Reference Only)
| Wire Size (AWG) | Approx. Torque (lb⋅in) |
| #10 – #8 | 80 |
| #6 – #4 | 165 |
| #2 – 1/0 | 275 |
| 2/0 – 250 MCM | 385 |